Back to TheWorxHub for Senior Living Main Menu
Adding a Widget to WorxIQ
Once you have been added as a user in WorxIQ, you can add widgets to your dashboard in order to view high level data about sites in your organization. Data displayed in widgets is updated from your TheWorxHub sites nightly to ensure that data is as up-to-date as possible.
How to Add a Widget
By default, the Analytics dashboard in WorxIQ allows you to add six widgets to the My Widgets tab. You can add as many additional tabs as needed, each of which can hold six widgets.
-
Click Add Widget in one of the six available spaces on the dashboard.
-
In the window that appears, choose from one of three options:
-
A list of widgets that have been made available for use by other WorxIQ users will be displayed. These can be selected to add to your Analytics dashboard instead of creating a new chart or table widget.
-
Click the + Add New Chart Widget button to add a widget that will display data in a chart or graph.
-
Click the + Add New Table Widget button to add a widget that will display data in a table.
-
Add New Chart Widget
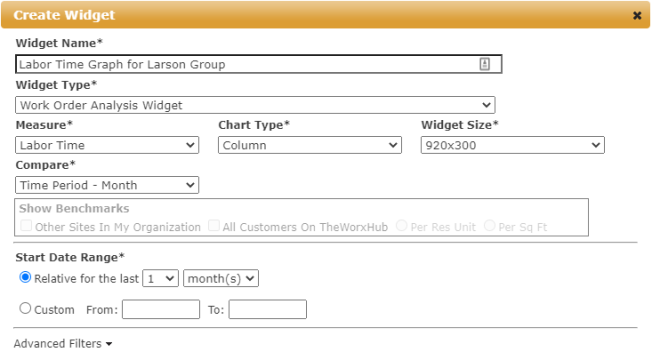
Enter a Widget Name.
Select a Widget Type from the drop-down menu. *Note: The options available in the Measure, Chart Type, and Compare drop-down menus will be affected by the selected Widget Type.
Select a type of Measure from the drop-down menu. The option selected here will be represented on the Y axis of the chart or graph, if applicable.
Select an option from the Compare drop-down menu. The option selected here will be represented on the X axis of the chart or graph, if applicable.
Select a Chart Type from the drop-down menu. This will determine how the data is displayed in the widget.
Select the Widget Size from the drop-down menu.
There may be other required fields to complete depending on the selected Widget Type. Fill out all required fields.
You can use the options under the Advanced Filters section to further refine the data displayed in this widget.
Check the box next to Favorite if you would like this widget to display under the Favorites menu when creating a new widget.
Check the box next to Subscribe if you would like to set up an email subscription to this widget on a recurring basis.
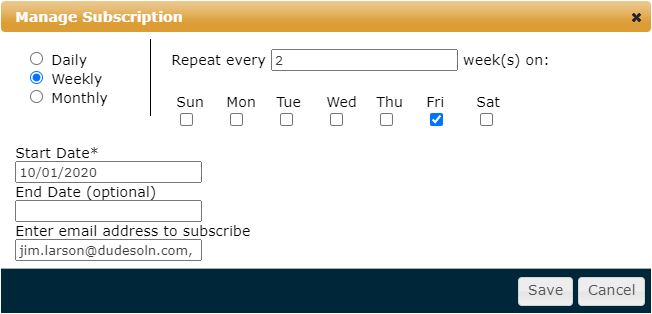
Click the Manage Subscription link to define the recurrence pattern for your subscription.
Choose whether you want the report to generate Daily, Weekly, or Monthly.
For Daily, you have two options:
You can choose a specific number of days between each generation of the report.
You can choose to generate the report on every weekday.
For Weekly, select the appropriate day(s) of the week and how frequently the report should generate on those days. For example, a report could be generated Monday through Friday every other week with a repeat value of two.
For Monthly, you have two options:
You can choose a specific day of the month and the frequency. For example, a report could be generated quarterly on the 15th of the month with a Day value of 15 and a month(s) value of three.
You can choose a day of the week and set the monthly recurrence. For example, a report could be generated quarterly on the first Monday of the month by selecting a value of First, a day value of Monday, and a month(s) value of three.
Use the Start Date to indicate when to start generating the report. The End Date is an optional field that can be used if you want to stop sending the report after a fixed period of time.
Enter the email addresses that you would like to receive the report.
Click Save to finalize the changes.
Click Save to add your widget to the dashboard.
Enter a Widget Name.
Select a Widget Type from the drop-down menu. *Note: The options available in the Measure drop-down menu will be affected by the selected Widget Type.
Select a type of Measure from the drop-down menu.
Select the Widget Size from the drop-down menu.
There may be other required fields to complete depending on the selected Widget Type. Fill out all required fields.
You can use the options under the Advanced Filters section to further refine the data displayed in this widget.

Check the box next to Favorite if you would like this widget to display under the Favorites menu when creating a new widget.
Check the box next to Subscribe if you would like to set up an email subscription to this widget on a recurring basis.
Click the Manage Subscription link to define the recurrence pattern for your subscription.
Choose whether you want the report to generate Daily, Weekly, or Monthly.
For Daily, you have two options:
You can choose a specific number of days between each generation of the report.
You can choose to generate the report on every weekday.
For Weekly, select the appropriate day(s) of the week and how frequently the report should generate on those days. For example a report could be generated Monday through Friday every other week with a repeat value of two.
For Monthly, you have two options:
You can choose a specific day of the month and the frequency. For example, a report could be generated quarterly on the 15th of the month with a Day value of 15 and a month(s) value of three.
You can choose a day of the week and set the monthly recurrence. For example, a report could be generated quarterly on the first Monday of the month by selecting a value of First, a day value of Monday, and a month(s) value of three.
Use the Start Date to indicate when to start generating the report. The End Date is an optional field that can be used if you want to stop sending the report after a fixed period of time.
Enter the email addresses that you would like to receive the report.
Click Save to finalize the changes.
Click Save to add your widget to the dashboard.
Managing Widgets
Once you have added widgets to your dashboard, you have a few options for managing them:
-
You can rearrange the widgets on your dashboard by clicking and dragging to adjust their position on the page.
-
You can favorite a widget or remove it from your favorites by clicking the star icon (
 )
) -
You can remove a widget from the dashboard by clicking the X icon. (
 )
)
